
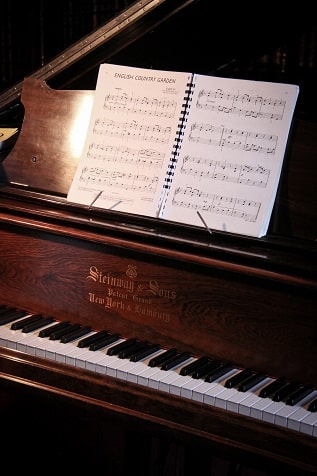
As an Amazon Associate I earn from qualifying purchases.
Playing piano by ear is a quick and easy way to learn the instrument. Knowing how to read piano sheet music is much more useful though. Reading sheet music opens up the amount of repertoire a person can learn.
There’s a common misconception that reading piano sheet music is hard, but with a clear strategy, it’s actually quite easy to learn.
Here’s how to read piano sheet music in 11 easy steps
- Learn The Locations Of The Keys
- Understanding The Treble Staff
- Understanding The Bass Staff
- Understanding Ledger Lines
- Focus On Counting Intervals And Landmarks
- Understanding Sharps, Flats, And Naturals
- Familiarizing Yourself With Key Signatures
- Labeling Note Names In The Sheet Music
- Understanding Dynamics, Rests, Articulations, And Tempo
- Clapping And Tapping Rhythms
- Practicing Piano Hands Separately Slowly
- Putting The Hands Together In Sections
Next, I’ll talk about each of these steps and the best ways to implement them into your practice routine. Learning these strategies will allow anyone to pick up a piece of sheet music and read through it with ease!
1. Learn The Locations Of The Keys
Before attempting to read any sheet music, there needs to be a clear understanding of what all of those black and white keys mean. This is one of the first things I outline in my piano course which you can check out here. The black and white keys represent all of the different tones of the piano.
As you look at the keyboard the first thing that should stick out to you is how the piano keys are organized in a pattern.

Looking at the diagram above it’s clear that there are groups of two black keys and groups of three white keys. That pattern of two and three repeats up and down the entire piano.
The first white note located in front of the group of two black keys is called C. Every time you see a group of two black notes, that first white key will always be a C. The lower the C you play on the piano, the deeper the tone will be. The higher the C on the piano, the brighter the tone will be.
The note located in front of the group of three black keys is F. The same logic applies here too. Because the piano is designed around the musical alphabet, it’s easy to see how the pattern repeats.
The seven different tones on the piano are A B C D E F G. These are the basic notes of the music alphabet, and they can be augmented in many ways which we’ll discuss later in the steps.
Spend some time familiarizing yourself with the diagram above. See if you can memorize where all of the notes of the musical alphabet are located. By doing this step first you are enhancing the visual ability to find notes quickly by recognizing the patterns.
2. Understanding The Treble Staff
Unlike most instruments, pianists have the tough task of reading two different music staffs. Together they create the grand staff, however, they contain both the treble and bass clefs.
The treble clef is often referred to as the G clef. The bottom line of the staff is E, and each line after that represents a skipped note. For example, the bottom line is E, the second line is G, the third line is B and so forth. The top line is F.

The spaces of the treble staff also are separated by skips. The first space is F, followed by A, C, and E.
One way to memorize the notes on the treble staff is to use the saying “Every Good Boy Does Fine. The first letter of each word represents the order of notes on the lines. For the spaces simply remember the word FACE.
The location of the notes on the treble staff is anywhere from middle C and upward. Middle C is the fourth C on the piano, usually where the brand logo appears.
Characteristics of notes in the treble staff are higher pitched compared to the bass staff. Most melodies you find in sheet music whether it’s Classical or Pop originate in this area.
While the right hand predominantly plays in the treble staff, there are occasions where the hands can switch roles. This includes hand crossing and occasionally playing pieces up or down an octave from their original location.
3. Understanding The Bass Staff
The bass staff operates just like the treble staff. The whole concept of the lines and spaces representing skips between pitches remains the same. What changes however is the notes that are on each line and space.
The bottom line of the bass staff is G and the top line is A. For the spaces, the bottom space is A while the top space is G.
An easy way to remember the notes is to base it off of the bass clef. The clef has two dots that center around the 4th line. This is called bass F, and it’s easy to find the rest of the notes based on that pitch (more on this later).
While the treble staff has most of the melodies and higher pitched notes, the bass staff plays a much different role. Bass staff is where most of the accompaniment takes place in music. Pianists will usually play single notes, simple rhythms, or chords to help create beautiful harmonies with the right hand.
Depending on the difficulty of the music, there are times when the melody will actually be in this region of the piano. For a pianist just wanting to learn popular music or traditional piano repertoire, the left hand will almost always play a supportive role in the music.
4. Understanding Ledger Lines
Where both staffs share some notes in common is around the middle C region. Middle C is truly the note that separates both staffs, mostly because it belongs to both. Look at the picture below to see what I mean.
Initially it’s a tricky concept to understand, however, it makes a ton of sense for reading sheet music. By having C as the central point, it’s easy to locate where the hands should go on the piano, and what pitches each hand will be primarily responsible for while playing a piece.
Each additional line that is added to each of the staffs is called a ledger line. These notes can be added below the staff or above the staff.
Ledger lines are an extension of the staff, so the same concept applies when trying to figure out which note to play. The same logic also applies to those spaces above and below the ledger lines.
For example, middle C is actually a ledger line that does not fit on either of the staffs. In the treble staff, the next line below middle C is A. If you’re trying this out on a piano right now, you may notice that A is actually the same A that is represented on the top line of the bass staff.
In general, ledger lines are a clean way to read sheet music without too much clutter. Take a look at the video below to get a full understanding of how ledger lines work when reading piano sheet music.

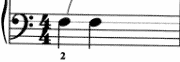
5. Focus On Counting Intervals And Landmarks
A quick easy way to get started reading sheet music is to focus on counting intervals based on landmark notes. The three notes that make the most sense to use are middle C, bass F, and treble G.
Middle C is directly in the middle of bass F and treble G, and so counting notes within each staff from those landmark notes makes note reading faster. The landmark middle C will mostly be used for reading notes that are on ledger lines, or just above the bass staff, and below the treble staff.
Take a look at the sheet music example below from this collection of easy classical piano songs.
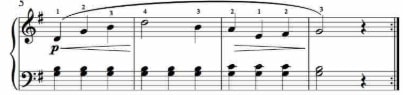
In the Diabelli Bagatelle, the pianist can easily find their starting notes by using all 3 landmarks. Looking at the bass staff, there is a chord made up of two notes.
To figure out the bottom note, simply locate bass F and then count up an interval of a second.
This gives us G. The note above the G is simply a skip above giving us B. For the right hand, simply take note of where middle C is located, and then count up a 2nd to get D.
To play the rest of the piece you can compare the relative distance between each beat, or even each measure on a broader scale.
Landmark notes are a quick way to identify exactly where to go on the piano and they are great for when a beginner pianist gets stuck and is not sure where to go.
6. Understanding Sharps, Flats, And Naturals
If you are not using a beginner piano method book, then chances are you may be exposed to sharps and flats early on.
Sharps and flats work much like the regular notes except they are the augmented version.
For example, play a sharp note means to play the very next note higher. If the note was F#, then the pianist plays the black key since it’s the very next key higher. Note the example below.

If the note were flat then it means to play the very next note lower as shown in the example below.

When a note has a natural sign, it means that any sharps or flats are canceled, and the note returns to it’s a natural state. In the case of a D# for example, it would simply become regular D again.
7. Familiarizing Yourself With Key Signatures
One last step to take before embarking on playing through piano music is to familiarize yourself with key signatures. Key signatures can be found at the beginning of each staff.
They are an indicator of which notes are going to be augmented with a sharp or flat anytime they occur in the piece of music. Unless otherwise instructed to be a natural note, those notes will take on the blanket settings that the key signature asks for.
Take a look at the example below.
 In this example, the key signature has two flat notes. They are B flat and E flat. As you can see the actual notes don’t have any symbols next to them.
However because the keys have been identified by the key signature, you will make that application to all the notes. So in this case, the B and E shown in the image would need to be played on the black keys.
The reason composers use key signatures is that they help make the music much easier to read. They also set the entire key for a piece and help with the entire harmonic structure of the music.
8. Labeling Note Names
With proper practice using landmarks and counting intervals, anyone can figure out what notes to play in the sheet music. In the beginning stages of learning though, it helps to have some simple indicators so you know what to play.
One thing beginner pianists can do is write down the note names on the actual sheet music. Labeling the note names next to or above the note can help make the learning process faster.
It’s never a wise idea to label all of the notes as that can clutter the music. Instead, focus on the notes that are particularly troublesome and use the labels as a reminder of what to play.
Note names can also be labeled on the piano keys themselves. Handy little note labels like these can be put on to the keys to help you make quick decisions while playing. Once you’ve become comfortable with a piece of music, try removing the labels and see if you can figure out where to place your hands.
Equally important is labeling the finger numbers so you can work on the distance needed to travel to play a certain melody or harmony.
9. Understanding Dynamics, Rests, Articulations, And Tempo
In all types of sheet music, there is a wide range of instructive symbols that help the music sound a certain way. Some of the symbols refer to how soft and loud a passage of notes are.
Others indicate when a pianist should be silent, and that exact duration of time. Articulations help when it comes to the character of the piece, making it sound more percussive or more lyrical.
Finally, there are indicators at the top of a piece of music as well as in the middle of certain sections of a piece.
Below is a list of the common symbols you will find in any piece of sheet music, and what they mean.

Piano – Not to be confused with the instrument name, piano is an Italian word meaning “soft”. The symbol can be found in between the treble and bass staff when it applies to both hands. If the composer intends for one hand to be soft such as the left hand, they will put the symbol under the notes in the bass staff only.
Forte – When a pianist sees this symbol, they should play that section of music loudly. The same rules apply for knowing whether one hand or both hands play at this level.
Mezzo forte & Mezzo piano – These two dynamic markings indicate medium loud and medium soft.
Andante – For slow and lyrical pieces, the Adante tempo marking is often found. This tempo operates between 76 – 108 BPM. A much slower tempo can be found in Largo which is at 60 BPM. A little faster tempo that’s not quite allegro would be Andante Moderato which taps in at 92 – 112 BPM.
Allegro – This is a common tempo marking for most fast pace pieces. It is best described as a walking tempo which hovers around 120 – 156 BPM if you are measuring with a metronome. Other variations of Allegro include Allegro moderato,
Vivace – For fast and exciting pieces the Vivace tempo marking is used. This is usually a piece operating at 156 – 176 BPM. This tempo is commonly associated with later movements of Beethoven sonatas, Liszt water pieces, Chopin Etudes, and various piano concerto compositions. An even faster variant of Vivaciissimo can be found in modern works.
Slurs – When music is to be played with a connected sound it is considered to be legato. To know when a certain passage should be played smooth, you’ll want to look for the slur symbol. This is usually a bar that connects once note to another within the same measure, or even across multiple measures.
Staccato – The opposite of connected is detached, and that’s where staccato markings come in. These are represented as small dots that you will find underneath or above the notes. When you see it, simply play the note as short as possible.
Accents – For march like songs or very percussive arrangements, you’ll run into this marking very often. Accents mean to add emphasis to that note so that it sticks out from the rest. This will have to be done within the overall framework of the piece.
For example, if this were a lyrical Chopin Ballade, you would want to still keep the line smooth and connected, but making sure certain voices stick out. Accents aid greatly when trying to push forward harmonic sections of music.
Time Signatures – In order to understand rhythm completely, pianists will need to know what the time signature is. Time signatures are an indicator of how many beats are in each measure.
If the time signature were to indicate 4/4, then that means there are 4 quarter notes worth of beats in that measure. The same can be applied for 2/4, 3/4, 6/4, and upward.
When there are eighth notes being used as the foundation of the meter, then the same logic applies except there will be an eight as the bottom number. That means 4/8, 6/8, 9/8, and so on will indicate how many eighth notes are in each measure.
Quarter Rest – The most basic note value you will find is a quarter note. It’s worth one beat and can simply be counted as such. Quarter rests operate the same way, except the pianist will operate in silence for that duration of time.
Half Rest – Half rests work the same way as quarter rests, but last for double the value. The pianist will take a two beat break in the music for either hand and then resume playing.
Whole Rest – Whole rests operate a little differently. Rather than being worth four beats of time, whole rests conform to whatever the time signature indicates. For example, if the measure is 6/4, the whole rest will last the duration of that measure. If it’s in 5/4, then it will last 5 beats and so on.
10. Clapping And Tapping Rhythms
Most beginner pianists have a habit of jumping straight into playing the music on the page. While the notes are important, rhythms are equally important.
As you look at a new passage of music, begin by clapping or tapping the rhythms on the page. For a beginner, I recommend clapping the rhythm of each hand separately. This helps ensure that you have a firm grip on what rhythms each hand is responsible for.
As you clap the rhythm make sure to count out loud. Counting out loud is an important part of playing any piece, and it helps solidify that you’re in the correct time meter. Using your voice to count also helps with establishing a steady rhythm.
Putting the hands together while playing can be a challenge. This is also the same when it comes to the proper execution of the rhythms. To helps with this I ask many of my piano students to tap the rhythm in their lap or on a flat surface.
When tapping the rhythm it’s important to count and make sure the hands enter at the correct time. If a pianist can tap and clap the rhythm correctly, it increases their chances of playing the notes correctly in time once they are added in the next step.
11. Practicing Piano Hands Separately Slowly
Sheet music should only be digested in small bits rather than all at once. A simple strategy is to start reading each hand separately at a slow tempo. Take your time going through each measure aiming to be as accurate as possible.
To properly sight read sheet music you should focus on eliminating any pauses or abrupt stops. While note accuracy is important, it’s very tough to develop a sense of rhythm with constant hiccups.
Because our ears are an important part of making music, it’s important to try to play everything correctly the first time you encounter a piece of music. To help with this I recommend phantom playing.
Phantom playing is a lot like tapping. You will play the music, except not on the keys. Instead, the music will be played in your lap or on the piano fallboard.
What this does is help establish correct finger placement, recognizing the distance between intervals, and also doubling down on the importance of rhythm. Unlike tapping rhythms, what phantom playing also does is develop a feel of transferring weight between individual fingers.
12. Putting The Hands Together In Sections
At this point, you should have a firm grip on what both hands can do individually. Now it’s time to see how they all fit together.
Because the rhythm has been thoroughly prepped in the previous steps, it’s a matter of simply putting the hands together in small sections.
Start by playing 2 measures at a time slowly. If there are any mistakes, then try to read them again until you can correct those mistakes. Ideally, to learn a section of music efficiently, you should aim to play each section at least 3 times in a row correctly.
This may take many more attempts to fix, however it will ensure that the section is thoroughly practiced.
Once you have a few small sections ready, start piecing them together into larger sections. A simple form analysis of the piece will help you find logical areas to section off. Most beginner pieces have a clear beginning, middle, and end section.
More substantial pieces will have more developmental material in between each of those sections.
Over the course of a few practice sessions, you will start to see the piece take form. Areas that were difficult for you will be more ingrained in your hands. You will even start developing a bit of memory and execution of playing the notes will be much sharper.
With consistent practice, this is how you can put a piece together the right way.
Tips To Learn Piano Sheet Music More Quickly
While the step by step tips written above are helpful, they can be time-consuming. There are some strategies to help cut down on the learning curve of reading sheet music. Below are a few ways to speed up the learning process.
Learn How To Play Major And Minor Scales
The majority of composed sheet music is based off some collection, variation, or nod to a scale. The passages at times will even fold in and out of various keys so that they make harmonic sense.

A good way to get a grip on what’s going on is to learn how to play major and minor scales. Scales are a great technical aid and can be played using very specific fingering. Once that fingering is mastered, it will be much easier to apply that fingering to the notes in the sheet music.
The eyes and ears will also be better prepared to recognize when a scale is happening in the music leading to faster learning of those sections.
Labeling Patterns
Music is made up of patterns, and it’s best to recognize those as quickly as possible in your sheet music. With a highlighter, label all of the sections that visually look the same to you. Then compare those notes to see if they’re the exact same pitches or a variant.
A lot of times pianists will find that certain passages will repeat themselves again later in the piece. Even on a basic level of musical form, one can expect the main theme of a piece to present itself in the same hand, another hand, or even the inner voices.
Labeling patterns help with faster recognition of those sections.
Memorizing The Sheet Music
Most pianists play their music from memory. Sheet music should be used as a guide, but never to the point where you cannot operate without it.
One way to increase the speed of learning sheet music is to memorize the music. By chunking the measures into smaller portions, it’s easier to digest the music more efficiently. Read this article on how to memorize piano music faster.
Memorizing sheet music allows you to focus your eyes on the choreography the hands are doing in each piece. It also helps cut down on mistakes made by missing notes because the eyes are focused on the page.
Hello & thanks for stopping by! I’m a professional concert pianist and piano instructor. In the United States, I’ve given successful performances in several places including New York, Florida, Connecticut, & New Jersey, I have also performed internationally in Italy and made my Carnegie Hall debut in 2014. I enjoy blogging about the piano, the art of performance, general music, current events and the latest in music production.
How To Play Faster On Piano - Joshua Ross
Wednesday 20th of February 2019
[…] Reading sheet music is a major factor in playing ability. That’s why most concert pianists memorize their music. With the music memorized, all of the focus can be put into the choreography of playing. […]
How To Memorize Piano Music Faster - Joshua Ross
Wednesday 20th of February 2019
[…] harmonies, sudden changes in tempo as well as melodic liberties. Whenever you listen to music it’s always a good idea to read through the sheet music at the same […]
Can You Play Piano Without Reading Music - Yes You Can! - Joshua Ross
Wednesday 20th of February 2019
[…] Reading sheet music can be both a primary way to learn music as well as a supplemental addition to someone who wants to also do it by ear. Check out this complete guide on how to read piano sheet music in just 11 easy steps. […]