
As an Amazon Associate I earn from qualifying purchases.
The more a piano is used, the dirtier it will become. From fingerprints to dust, water stains, and rust, pianos can get quite messy. Every once in a while, your piano needs proper cleaning. If this is your first time cleaning a piano then you may be wondering how to clean a piano the right way. After many years of cleaning my own piano, I can share with you some of the best ways to do it.
This is how to clean a piano. Use vinegar and warm water solution to clean the keys. For the outer casing, use a nonabrasive cloth and special polish to prevent scratches and preserve the pianos glossy finish. Dust can be removed with a light feather duster or damp cloth. Rusty strings should be cleaned with a coarse wipe.
Knowing how to clean a piano is important because doing it the wrong way can actually damage the instrument. Next, I’ll go into detail about how to clean each area of the piano the right way so that it lasts you for generations. Let’s start off with the easiest part of the piano to clean; the keyboard.
Want to Learn Piano?Click Here

How To Clean A Piano Keyboard
The black keys of a piano generally need very little cleaning; at most a dusting. The white keys, however, are more prone to staining, and it’s easier to see the dust and fingerprints on these.
Most piano keyboards have keytops that are made of plastic material. This makes them relatively easy to clean with the right polishes or even a simple combination of water and alcohol.
I recommend using Cory’s polish for this part of the piano. Their polish doesn’t leave any film residue, and it does a great job of removing dead skin and dirt from the keytops. Music Nomad also makes a good polish that is gentle on plastic keys as well.
If you have an older piano that uses ivory keys, then you’ll want to use this specific method to whiten them.
Ivory keys are quite difficult to work with because they can sometimes turn yellow after a while. They are also more porous and sensitive to the chemicals in today’s plastic key cleaners. If the ivory keys get to wet, it can actually soak that moisture into the wood which will inevitably cause swelling.
To clean ivory keys, you can use a combination of toothpaste or lemon juice for cleaning. Lightly dampen the cloth and then apply the ingredients.
For the heavy smudges caused by dirty hands or pencils, you can use rubbing alcohol. To combat the yellow color you can actually use bleach to try to whiten the keys.
When using bleach I recommend removing those individual keys that have turned yellow. This way you can more closely match the whiteness of all of the other keys.
Whatever key material you have, you should always use a nonabrasive cloth to wipe them. I find that microfiber cleaning cloths work best. They are gentle enough on the instrument, but also have enough grip to remove stains.
Cotton swabs are also good for cleaning hard to reach areas of the keys.
Starting with the white keys, apply the polish and scrub the top of each key one at a time. Be careful to not let the solution drip in between the keys and soak into the wood.
If your piano keys have dust on them, it’s a good idea to rub those with a dry cloth first. Mixing dust and the solution together will only create more stains.
The Proper Way To Clean Piano Pedals
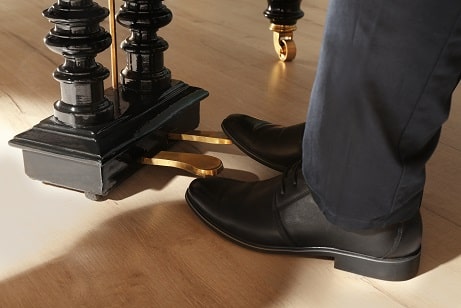
The next area to clean on a piano is the pedals. Pedals are made from various metals. Some are brass coated while others are made with chrome. Keep this in mind when choosing a polish for cleaning them.
If your piano is used often, chances are the pedals have scuff markings from shoes. Some pedals also experience some corrosion and green tarnish depending if it’s nickel or brass plated.
These can be worked off by using a polish like Noxon 7. Noxon 7 is a popular liquid metal polish that’s also good for rust stains.
Just add a bit of polish, rub it on the surface of the pedal and let it sit for a few minutes. This allows the polish to work through the corroded areas.
After that continue to rub the pedal and you’ll notice it starts to have a different appearance almost right away.
It’s a good idea to put a protective cloth on the wood that the pedals sit in. You would not want to get any of the solutions on the wood as that could cause damage.
Dusting And Polishing The Outer Casing
The area that will collect the most dust is the piano casing. The lid of the piano will collect the most dust as well as the sides of the piano along with the fallboard.
The first thing you should do is remove the dust with a feather duster. Microfiber dusters work well too. I like to use a tube-shaped duster so I can reach to the far ends of the instrument more easily.
After dusting the entire piano then you can begin applying polishes to remove grime. This is usually a two-step process because a piano needs to be primed first.
Pre-polish is best used as a fingerprint remover, but it also removes oils, contaminants, book imprints, paw prints, and dirt too.
After removing all of the markings on the piano, it’s time to return it to its original finish. Most available polishes work for ebony and satin finishes. Anything with lacquer, polyurethane, or high-gloss finishes are also covered.
Cory, for example, has UV protection in it, for those who have pianos near windows. That protection helps prevent fading in whatever areas are exposed to sunlight.
The reason I’m a big fan of Music Nomads polish is the ingredient in it. This polish has carnauba wax which doesn’t fog up once it’s wiped off. The Brazilian wax is known for producing a glossy finish so it’s a great choice for pianists.
While most polishes will remove small scuffs and grooves, they will not get rid of surface scratches. To fix that issue, you will want to contact your local piano technician.
Cleaning The Inside Of The Piano
The most delicate are of the piano is not the keys or the outside casing; it’s the inside of the piano. This is the location where all of the intricate parts of a piano are housed.
The cast iron plate, soundboard, strings, hammers, dampers, and rest of the entire piano action. Let’s start off by describing how to clean each specific area the correct way so that no damage is caused to these fine materials.
How To Clean The Inner Piano Casing
The inner casing is where most of the wood is exposed. Generally, the only thing you will find here is dust. This is a simple area to clean with a feather duster. For the really dirty areas, you may want to dampen the cloth just enough to lift the dust.
As you work around the rim of the piano be careful not to bump any of the strings.
Because the soundboard is located right beneath the sides, it’s a good idea to place a towel on the inside of the piano first to catch any falling dirt or dust. This is also a good time to clean the inner lid of the piano while it’s open.
When you’re done wiping, simply roll the towel up and shake it out in another location.
How To Clean Piano Strings
Piano strings can have all sorts of stains. Mostly you’ll find that dust collects between the upper strings, and cleaning that space out can be difficult.
While a feather duster works great, you may want to use cotton swabs or a toothpick wrapped in thin cloth to remove those particles.
I also find that paint brushes with thin soft bristles work well. Move the brush back and forth guiding with the edge side to easily get into those small areas between the strings.
Older pianos may have rusty strings depending what kind of material they are made with. Something more abrasive like a coarse sponge or steel wool works well here for lifting the rust off.
Remember that rust can sometimes become powdery and lift into the air, so you should clean it off with a mask on to be safe. Make sure to lightly scrub the bridge pins as well as front pins.
Once you’ve done that, you can wipe the strings down with a damp cloth.
Because the strings are made from metal, the water won’t cause any damage. It’s important to clean rust off the minute you see it because the buildup of rust can cause strings to break.
I recommend cleaning the strings prior to a piano tuning. Messing with the strings after a tuning will cause the piano to go out of tune again which in turn will cost you another round of tuning.
How To Clean The Piano Soundboard

The piano soundboard is one of the most difficult areas to clean. For one it’s fragile and should be approached carefully. Also, it’s really hard to reach this area without having to disassemble the entire instrument.
A quick solution is to invest in an under appliance duster like this one; it’s thin enough to reach underneath the piano strings and has a handle for easy use.
My method for cleaning the soundboard doesn’t involve any of that. All you need is a microfiber cloth and steel ruler. Make sure the ruler is deep enough to reach the soundboard, preferably 6″ to 7″ in length.
Start off by dropping the microfiber cloth underneath the bass strings. Using the steel ruler, begin working the cloth along the length of the piano. This will, in essence, pick up any dust and work as a way to slowly wipe everything up.
You can work the cloth easily through the front section of the strings, but underneath the back end, it’s a little trickier. Have patience and be careful not to chip anything as you clean the soundboard. Once you’ve gotten the cloth to the other end, simply pull it out.
At this point, you may see quite a bit of loosened up dust on the soundboard. You can use an air blower or fan to get rid of it.
How To Clean The Piano Action
The last area of the piano that needs cleaning is the action. This area can be cleaned at the same time as the strings because you’ll use a lot of the same tools. For the dampers simply press down the pedal with your foot and come under each one with a feather duster.
Be sure to be gentle with this area so no felt is accidentally shifted out of place. For the hammers, you can actually pull the action of the piano out and clean each one individually. Here’s a video showing how to pull out the action of a grand piano.
With each hammer take a cloth and gentle go over each one. Also check for dust build up in the wooden rods, knuckle, and repetition levers too. Take a look at how a piano works here so you can see all the different areas the action is made up of.
Hiring A Professional To Clean Your Piano

If you have a very valuable or antique instrument, then cleaning it yourself might seem a bit scary. This is where I would encourage you to hire a professional to do it.
Many piano technicians offer specialized cleaning services that can be tailored to your specific instrument. The manufacturer of your instrument can also provide helpful tips on cleaning and services as well.
Tips To Protect A Piano From Getting Dirty
Once you’ve cleaned your piano, it’s a good idea to protect it from getting dirty in the future. Here are a few things you can do to keep it from getting dirty and maintaining it’s shine.
Always Use A Piano Cover
Piano covers are a great way to stop dust from getting on the surface of the instrument. Covers can be expensive, but they are worth the investment. Many of them are padded so they also help protect against scratches and accidental bumps.
While it’s common to see piano covers on grand pianos, they make them for upright instruments too.
Never Leave The Piano Open
Leaving the piano open after your practice is the main contributor to dust. After playing you should always close the lid so that the strings don’t collect dust particles.
It’s also a wise idea to cover the fallboard so that the keys do not pick up any dust either. For extra key protection, it’s helpful to get a dust cover cloth like this one. They are constructed from felt material which is gentle on the keys and will catch a majority of the dust.
Related Questions
How much does it cost to replace piano keys? Particularly with really old pianos, it may be necessary to replace the keys instead of cleaning them. A plastic piano keytop costs about thirty bucks per set of 52.
Can I use Pledge to clean my piano? While Pledge is great for furniture, it’s not recommended to use on pianos. The chemicals will actually end up damaging the finish on the instrument. You should use Cory or Music Nomad polish instead.
Hello & thanks for stopping by! I’m a professional concert pianist and piano instructor. In the United States, I’ve given successful performances in several places including New York, Florida, Connecticut, & New Jersey, I have also performed internationally in Italy and made my Carnegie Hall debut in 2014. I enjoy blogging about the piano, the art of performance, general music, current events and the latest in music production.
How to Clean Ebony Finish Piano (Tips And Homemade Options) - Joshua Ross
Saturday 16th of February 2019
[…] safe an efficient way to clean pianos is to use specially formulated polishes and conditioners. There are quite a few good brands out there, but I highly suggest using Cory or Music Nomad […]
How Long Do Pianos Last - Joshua Ross
Friday 15th of February 2019
[…] Ultimately what dictates the longevity of any piano is how well it is cared for. Regular maintenance, proper temperature control, and keeping the instrument clean has a huge impact on its life span. […]
Upright Piano Vs Grand Piano - Joshua Ross
Thursday 7th of February 2019
[…] same can be said for dust collection, especially when the lid is open. Cleaning a piano takes a lot of work, especially when trash gets stuck in between the strings and falls on the […]
Why Does My Piano Buzz - Joshua Ross
Saturday 2nd of February 2019
[…] If you see they are covered in dirt and dust, simply clean them with a dusting wand or napkin. Here’s a guide on how to properly clean piano strings. […]